Monday 21 December 2015

Boxes of Joy

Last of the Christmas makes using Winter Wonderland DSP.  Whipped up these Tiny Treat boxes using 2" squares of this beautiful paper, small circles of gold glitter and whisper white card.  I stamped JOY using Sophisticated Serifs, and gold emboss powder.


I filled the boxes with After Eights, as I know the recipients of these boxes love them. What can bring more joy than chocolate?

Check out the Winter Wonderland Paper in the Year End Sale via my online shop now.

Wishing you all joy over the Christmas period, with your loved ones and a craftastic New Year! 
Built for Free Using: My Stampin Blog

Sunday 20 December 2015

Birthday Bouquet


This afternoon I've been playing with the new Birthday Bouquet Designer Series Paper (DSP), available to buy January 5th 2016.  I love the gorgeous floral designs & sweet subtle colours, such as Blushing Bride, Pool Party mixed with In Colours; Mint Macaron & Watermelon Wonder.

I started with a piece of the Blushing Bride DSP stripey paper, with floral on the reverse. I trimmed to 6x4" (with 12x12 paper I find it easier to cut out as much as I can and then trim to size later). I chose a flower from the reverse and cut it, and a couple of smaller flowers and leaves out. I find fiddly cutting quite therapeutic, and did it sat on the sofa listening to the TV.  

I used the Happy Day stamp from the Perfect Pairings stamp set I received free from the Sale-A-Bration catalogue (also available January 5th).  I stamped in Blushing Bride and cut using scissors to the shape of a large banner. I started to lay everything out (before sticking down) so I knew what it would look like.  I then cut a piece of Blushing Bride cardstock in half (portrait) and scored down the middle. I stuck the sentiment down with a small piece of the new Pool Party Glitter ribbon, then positioned my flower using dimensionals for that 3D effect. I used glue to add the smaller flowers and leaves that I had cut out, and finished the card off with a few spots of glitter and gold twine.
I had a strip of DSP left, so I decided to make a matching gift box too.  I adore the tiny treat boxes, and had some left after my Christmas makes.  I used the Perfect Pairings stamp set again for the Happy Birthday sentiment, offcuts of DSP, glitter ribbon and gold twine.

Watch out for my new blog site, coming in the New Year, with more details of Sale-A-Bration and the new Spring/Summer catalogue.  Until then you can find the other products used via my online shop.
Built for Free Using: My Stampin Blog

Monday 14 December 2015

A Festive Family Feast

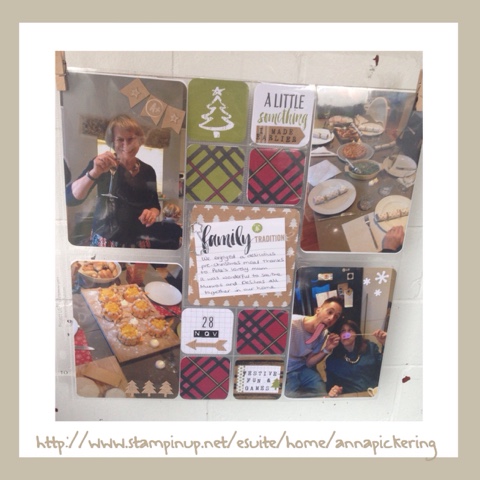
We had family up from London during the last weekend in November, to celebrate a pre-Christmas feast (as Pete's Mum & Stepdad would be in Sri Lanka over Christmas).  It was lovely to gather round the table and enjoy the fabulous feast prepared by Pete's Mum.  She always makes such an effort, and her food is delicious, so I gave her the A+ sticker in the accessory kit, layered on top of the kraft bunting, and drew round it with white pen for emphasis.

The page was based around the 'family tradition' card in the centre, because of course the Christmas meal is the most important tradition of the season, attached to a 4x4" card using the Christmas tree paperclip, and finished with the small tree sticker. 

The small 2x2" cards were filled with a mixture of 2x2" cards, and a 4x4" card cut up.  I improvised with the 'A Little Something wicked' card by sticking a kraft label over 'wicked' and stamping "I made earlier', using the Rotary Stamp. 


I used my trusty Project Life Corner punch to round all the corners of the cards and photos, making the page look softer, and finished it using lots of stickers to for embellishment; snowflakes, christmas trees, labels, numbers, letters, (and I still have lots left!) 


I also want to show you another page I made really quickly with this kit, so you get an idea of how simple or how fancy you can make a page. 


I literally threw the photos in, chose some 3x4 decorative cards and cut a 6x4 journaling card in half for the middle two. I used a couple of stamps from the Day to Day Project Life Stamp Set, and simply rounded all the corners. Easy, yet effective. 


Seasonal Snapshot is such good value for money, especially now it's even cheaper with up to 60% off in the End of Year sale.  Go check it out via my online shop.
Built for Free Using: My Stampin Blog

Friday 11 December 2015

This Is The Life (Part 2)

I was having such a good time the other day, I managed to finish two Project Life pages using This Is The Life kit.

As soon as I saw the tiny 2x2 cards in the This Is The Life accessory pack, I knew they'd be perfect for this page from Variety Pack 2.  I got the tiny 2x2 photos printed through an online company called odd prints, a great photo site for printing tricky sizes (perfect for smaller 3x4 or these 2x2 photos for Project Life pockets). 


The bright Bermuda Bay & Crushed Curry colours of the cards helped enhance the adorable photos of my son run tucking into his (and our) ice cream on our holiday. 

I did 'mix it up' by throwing a Nom Nom Nom card in from Seasonal Snapshot kit, couldn't resist as it was so apt for this page. (Again, if you have more than one kit then don't be afraid to let your creative juices flow when creating a page).


The clear/white stickers in this album are fab for laying over photos. They look really effective, especially over the blue of the table in these shots.  I can't believe how many stickers you get in this pack, someone's gonna have to stop me from sticking them on all my pages!!

For the 4x4 centre I used a 3x4 card behind a photo I trimmed down. I didn't like the grey concrete , and always find trimming a photo to show a sliver of colour can make the photo really come to life. 


You can order everything I have used above via my online shop.
Built for Free Using: My Stampin Blog

Wednesday 9 December 2015

Thank you

This morning I made a thank you card for my lovely mother-in-law who came all the way from London with a car full of home made festive food last weekend.

The card was inspired by a stamper called Mercedes Weber, who makes the most beautiful creations.  I had seen it a year ago on Pinterest, and pinned it in the hope of one day re creating it.

I used the Winter Wonderland DSP that I had ordered in for my Christmas Paper Stars, as background.  The card is a small 4"x 4" note-let, so the stripey background piece was cut to 3 7/8" x 3 7/8" to fit snugly inside.  I ran the smaller butterfly die from the Butterflies Thinlits set through my Big Shot using Gold Glimmer Paper,  then used the Hello You thinlet words 'thanks' and 'you' (I cut the 's' off thanks) with whisper white card (top tip: don't use the thicker card for intricate thinlets like this, you will be there all day, just use normal whisper white card and layer a small piece of wax or baking paper in between the card and the thinlet, this helps the words slide right out).

Lastly, I used the framelit from the Balloon Framelits set to cut out gold bunting for the top left corner.  Next came the tricky part of layering it all on top of each other.  I started by sticking a small section of a doily, ripped off rather than cut perfectly, onto the stripey golden background.  Then the butterfly came next, the bunting and lastly, the words.  I finished off by decorating with gold sequins from my gold sequin trim.
Built for Free Using: My Stampin Blog

Tuesday 8 December 2015

This Is The Life

Yesterday was one of those Magical Mondays where everything went right (for a change!). My son was happily playing, the house was looking ship shape and I could finally breathe through my nostrils again!! So, when my son went to nursery in the afternoon, I indulged in my guilty pleasure; Project Life!!

I went through my album and picked out some unfinished pages that I thought would look good with my new 'This Is The Life' kit & matching accessories. The colour scheme is bright; Crushed Curry, Bermuda Bay, Cucumber Crush, Watermelon Wonder, and Rich Razzleberry, so I knew that it had to be for a summer page.

I printed the title 'The boys of summer' in as close a match to Cucumber Crush green as possible (printing is sometimes the quicker option for me). I did whip out my trusty and much loved Rotary Stamp though to stamp 'Kate's House' underneath a location sticker.  The 4x4 heart card is actually from Moments Like These kit, don't be afraid to mix it up if you have more than one card collection!!

I used the crushed curry letter stickers for September and stamped 3rd in Cucumber Crush using the Day to Day Project Life stamp set (one of my most used!). I love all the stickers in this set, but especially the clear/white stickers, they look so effective over the photos.


I finished the page by rounding the edge of the photos and cards using the Project Life Corner Rounder Punch, and scribbling my journalling using a Project Life Journalilng Pen. I think I may have to invest in some Stampin' Up! Write Markers on my next order for colourful journalling, to brighten my pages even more!! 


Why don't you have a go yourself? Project life is super easy, and fun.  You can find all the supplies you need to get started on via my online shop

Supplies Used:

Monday 7 December 2015

Walking in a Winter Wonderland

What a wonderful festive weekend we had; meeting our friends for Christmas lunch on Saturday and chilling at home watching Christmas movies on Sunday. Somewhere inbetween all that I managed to grab a little crafting time.  I had ordered the gorgeous Winter Wonderland Designer Series Paper (DSP) last week, and couldn't wait to make Christmas stars with them.

I had made these Christmas stars a few weeks ago, but not with these papers. I'd seen them in the Stampin' Up! Christmas Catalogue and had to Pinterest them to find out how to make them myself.  After watching a video via Chic n Scratch I was all clued up on how to make these gorgeous handmade Christmas decorations.


They are so simple to make, you literally only need paper, scissors (I used guillotine as I have one), glue, a ruler, pen and glue dots. I finished them with lengths of metallic gold twine to hang them on my shelves.  If you like the look of them, go and check out the video and have a go yourself.  Don't forget to order the Winter Wonderland DSP via my online shop, hurry though as these beauties will be retiring after Christmas.
Built for Free Using: My Stampin Blog